Wednesday, April 23, 2008
Starting an Amigurumi Doll
Yes, I have managed to step away from the computer. But not for long... I'm starting an amigurumi doll that will reveal itself at a later time. The last one [link] I did was cotton, which started to get really worn from the handling. By the time I was done with it, it looked like it went through a wash. So this time I got acrylic for the wear-n-tear. Bernat Satin Sport to be exact. I think it looks pretty good for acrylic. And I like the tightness of the smaller gauge.
Like my handmade stitch marker? I'm too cheap to go buy them so I made them out of scrap beading materials.
Actually, the real reason for the post was to try out our new camera. Got the Canon Rebel XTi EOS! Digital! Love it!
Labels:
crafts
Tuesday, April 22, 2008
Dean's 3D Sci Fi Poster
My friend Dean caught the same bug as me - to get back to our original dreams when we went to art school. To create art for ourselves. Here's his latest creation:
He used Photoshop and Poser to create his illustration, then he cut out and mounted pieces to create this awesome work.
His prints (with 3D glasses!) are available at GongamuttStudios.etsy.com.
He used Photoshop and Poser to create his illustration, then he cut out and mounted pieces to create this awesome work.
His prints (with 3D glasses!) are available at GongamuttStudios.etsy.com.
Monday, April 14, 2008
1970's Japanese Craft Magazines
I grabbed some old Japanese craft magazines while visiting my mom over the winter. They are really hilarious. My favorite is this American style decorated lounge:
And I also found this. Thought I'd share it since the long socks were such a hit at the Ren Fest:
Close up of pattern (good luck figuring it out!):
And I also found this. Thought I'd share it since the long socks were such a hit at the Ren Fest:
Close up of pattern (good luck figuring it out!):
Labels:
crafts
Wednesday, April 9, 2008
Underline Text in Adobe Illustrator
This has always baffled me. Why can't you underline text in Illustrator? Is it hidden somewhere I can't see? Maybe in the new version you can. But since I'm still behind on my updates, I'm not sure.
I found the workaround awhile ago. It is one of the strangest methods I've run across. You have to have Photoshop open. Copy and paste the text into Photoshop document, then you set the text to be underlined, and finally copy and paste the text back into Illustrator. Vi-o-la!
If there's a better way, please let me know!
Labels:
web design
Saturday, April 5, 2008
No Fuss Flash Preloader
My quick and easy preloader method is not the fanciest. Nor is it the best method. It probably is considered old-school. But so far for me it's the least complex and hasn't failed me yet. Note that this method will cause the movie to not play until it's COMPLETELY loaded. It has no counter or loader bar, but it can be modified to have one.
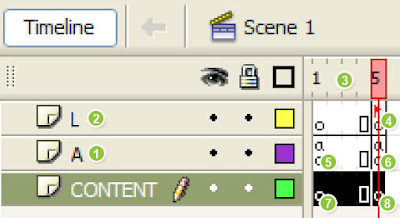
1. Create a layer in the timeline for actionscript. I usually name it "A". This is where I put all my actionscript for that specific stage or movieclip.
2. Create a layer in the timeline for lables. I name it "L". This is where I have all my labels.
3. I add around 5 frames in my timeline, on all layers. I just like to have a little padding visually in my timeline. I make the 5th frames into blank keyframes.
4. On that keyframe (5th frame), layer L, I label it "startmovie". This name can be whatever you want it to be. It is labeled so it can be identified as the actual start frame of my movie.
5. On the first frame of Layer A, I put the following actionscript:
stop();
this._lockroot = true;
counter = this.createEmptyMovieClip("counter", 0);
counter.onEnterFrame = function () {
if ((_root.getBytesLoaded() > 0) && (_root.getBytesTotal() == _root.getBytesLoaded())) {
delete(this.onEnterFrame);
gotoAndStop("startmovie");
}
}
6. On the 5th frame of layer A, I put whatever actionscript that needs to be initially triggered for the movie. If you put a play() action on that frame, remember to make a frame down the timeline that has a stop() or if you want to loop - gotoAndStop("startmovie"). If you don't, it will loop back to the first frame which is the preloader script.
7. On the 1st frames of the layers where you are going to put your movie content, you can put a message or animation to indicate that the movie is loading. Just remember, whatever you put there, it has to load first before it can display. So there might be a flash of blank screen before you see anything.
8. Finally on the 5th frames of the content layers is where you will start your movie.
Labels:
web design
Friday, April 4, 2008
SWFObject
Don't forget to replace the default object/embed tag that places a SWF file on a web page. Currently, Internet Explorer forces you to click on a SWF object before you can interact with it. So when your client says "Why do I have to click on the Flash twice?," that's why.
The best solution I found so far is SWFObject. Here are the steps for a very basic installation:
<!DOCTYPE html PUBLIC "-//W3C//DTD XHTML 1.0 Strict//EN" "http://www.w3.org/TR/xhtml1/DTD/xhtml1-strict.dtd">
<html xmlns="http://www.w3.org/1999/xhtml" lang="en" xml:lang="en">
<head>
<title>SWFObject</title>
<meta http-equiv="Content-Type" content="text/html; charset=iso-8859-1" />
<script type="text/javascript" src="swfobject.js"></script>
<script type="text/javascript">
var flashvars = false;
var params = { wmode: "transparent" };
var attributes = false;
swfobject.embedSWF("myContent.swf", "myContent", "300", "120", "9.0.0","expressInstall.swf", flashvars, params, attributes);
</script>
</head>
<body>
<div id="myContent">
<p>Alternative content</p>
</div>
</body>
</html>
I usually add wmode="transparent" in case I have html dropdown navigation on top of the flash. If I don't have this, the navigation will go under the Flash.
Here's a nifty swfobject generator - link.
There are a lot more you can do with SWFObject. The zip has great examples as well. It is updated often, so always read the instructions and download latest from here - link.
Another little tip: on Firefox, if you click on a flash, an annoying dashed border appears around the swf. Put this in your CSS and it should fix it:
object { outline: none }
The best solution I found so far is SWFObject. Here are the steps for a very basic installation:
- Download the zip file (link) and extract it.
- Put couple of files in your web directory: swfobject.js and expressInstall.swf
- Add some code on the page (I like the dynamic method):
- Put this in the head tag:
<script type="text/javascript" src="swfobject.js"></script>
(make sure the path to the js file is correct) - Put this also in the head tag:
<script type="text/javascript">
swfobject.embedSWF("file name", "div id", "width", "height", "version", "expressInstall.swf");
</script>
Change "file name" to your file name with correct path.
Change "div id" to id of the div you are placing the swf.
Specify "width" and "height".
Specify your swf "version". For example: "9.0.0".
Make sure the path to "expressInstall.swf" is correct. - Create a div in the body of the html that is to hold the swf. Give it an "id", same as what you specify above javascript for "div id".
- Add alternate content in the div. This content will show if the user doesn't have Flash installed.
- Put this in the head tag:
<!DOCTYPE html PUBLIC "-//W3C//DTD XHTML 1.0 Strict//EN" "http://www.w3.org/TR/xhtml1/DTD/xhtml1-strict.dtd">
<html xmlns="http://www.w3.org/1999/xhtml" lang="en" xml:lang="en">
<head>
<title>SWFObject</title>
<meta http-equiv="Content-Type" content="text/html; charset=iso-8859-1" />
<script type="text/javascript" src="swfobject.js"></script>
<script type="text/javascript">
var flashvars = false;
var params = { wmode: "transparent" };
var attributes = false;
swfobject.embedSWF("myContent.swf", "myContent", "300", "120", "9.0.0","expressInstall.swf", flashvars, params, attributes);
</script>
</head>
<body>
<div id="myContent">
<p>Alternative content</p>
</div>
</body>
</html>
I usually add wmode="transparent" in case I have html dropdown navigation on top of the flash. If I don't have this, the navigation will go under the Flash.
Here's a nifty swfobject generator - link.
There are a lot more you can do with SWFObject. The zip has great examples as well. It is updated often, so always read the instructions and download latest from here - link.
Another little tip: on Firefox, if you click on a flash, an annoying dashed border appears around the swf. Put this in your CSS and it should fix it:
object { outline: none }
Labels:
web design
Wednesday, April 2, 2008
Star Wars Amigurumi
Check them out on GeekCentralStation (link)! I want to all of them!!! She also has LOTR ones and some with patterns!
Windows XP Web Form Elements in Vector
I created these for wire frames I'm doing for a website project. I thought I'd share them. They can be used for design comps to represent web form elements. They are in Adobe Illustrator format, so resizing is easy. I also left in the text boxes so it's easy to change the copy. They are not perfect, but I hope they come in handy!
Download Zip
Download Zip
Labels:
web design
Subscribe to:
Posts (Atom)